
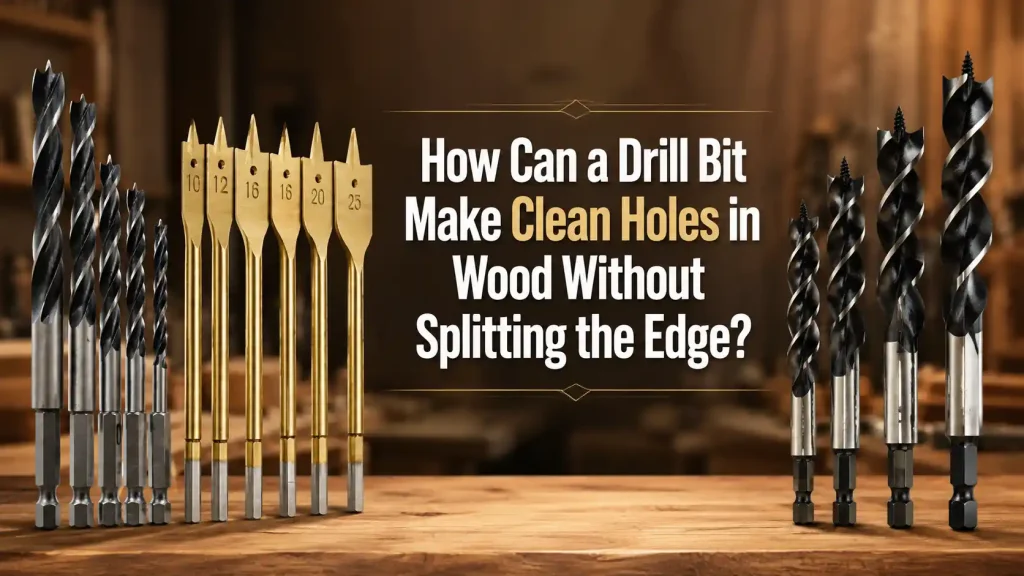
A clean wood hole can still fail at the edge. The mark is correct, the drill is straight, and the board is clamped, but the exit side splinters, the face grain lifts, or the hole looks ragged around the rim. This happens in cabinet work, trim installation, shelving, furniture repair, and site fitting where the hole remains visible. A Drill Bit does not only remove material. It also controls how the grain is cut, how chips leave the hole, and how much pressure reaches the edge before the bit breaks through.
Quick Answer
A Drill Bit makes cleaner holes in wood when the bit style matches the wood, the point starts accurately, the cutting edges are sharp, the work is backed up, the drill is held square, chips are cleared, and feed pressure is reduced near breakthrough. Splitting and tear-out usually come from dull edges, unsupported exit grain, too much pressure, wrong bit geometry, high speed with heat, or a bit that is allowed to wander before it starts cutting.
For visible woodworking holes, Drill Bit selection should be based on grain direction, hole diameter, depth, finish quality, and whether the hole exits the board. A rough construction hole can tolerate more damage than a shelf pin hole, hinge pilot, dowel hole, or cable pass-through in finished wood. The cleaner the edge must be, the more the setup matters.
Why Wood Splits Around a Hole
Wood is not uniform like metal or plastic. Grain direction, density changes, knots, glue lines, veneer layers, and moisture all affect how the hole opens. A Drill Bit that cuts across the grain cleanly in soft pine may behave differently in oak, plywood, MDF, or laminated panels. When the cutting edge pushes fibers ahead of the hole instead of slicing them, the surface can lift or split.
Splitting often appears near the exit side because the fibers are no longer supported. The bit pushes the last thin layer outward, and the face breaks before the cutting edge finishes the circle. Tear-out can also happen at the entry side if the point skates, the bit is dull, or the drill angle changes. A Drill Bit should start cleanly, cut the rim before removing the center, and carry chips out without forcing the wood apart.
The problem becomes more visible when holes are close to an edge, near end grain, or in thin stock. These locations have less surrounding material to resist pressure. A cabinet side, drawer front, stair component, or finished panel may be structurally fine but visually unacceptable after one torn hole. Preventing the damage is easier than hiding it later.
Match the Bit Style to the Hole Quality
Different wood holes need different cutting action. A twist bit can drill many general holes, but it may wander on smooth wood and tear fibers when sharpness is poor. A brad-point style centers more accurately because the point locates the mark while the outer spurs cut the rim. An auger style can clear chips in deeper holes, but it needs control so the screw point or feed action does not pull too aggressively.
A Drill Bit for wood should be judged by point control, rim cutting, chip removal, and how it behaves near breakthrough. For shallow pilot holes, a small sharp bit may be enough. For dowel holes, shelf pins, hardware holes, or visible openings, clean rim control becomes more important. For deep holes, chip clearance and straight tracking become major concerns.
The term drill bit covers many cutting shapes, so the name alone does not guarantee the finish. The same diameter can be made with different point angles, flute shapes, coatings, and edge designs. A Drill Bit that is excellent for fast rough drilling may not be the best choice for a finished cabinet face.
| Wood hole requirement | Better bit behavior | Setup detail that protects the edge |
|---|---|---|
| Visible face hole | Centering point and rim-cutting edge | Mark accurately and start at low pressure |
| Dowel or shelf pin hole | Straight tracking and consistent diameter | Use a guide or stop collar when accuracy matters |
| Deep cable or service hole | Strong chip clearance | Withdraw periodically before chips pack |
| Thin panel hole | Low pressure near breakthrough | Support the exit side with backing material |
| Edge-adjacent hole | Controlled start and sharp cutting lips | Clamp firmly and avoid side load |

Start With the Surface, Not the Trigger
A clean hole starts before the drill runs. Mark the center clearly, support the board, and decide whether the exit side needs backing. If the finished face matters, protect it from scratching and clamp the work so it cannot lift. A Drill Bit that starts on a moving board will often cut an oval or ragged hole even if the bit itself is sharp.
For accurate visible holes, make a small indentation or use a bit point that can locate the mark. Do not let the bit skate across varnish, laminate, or hard grain. Start with light pressure until the rim is established. Once the outer fibers are cut, the drill can feed more steadily. A Drill Bit that begins cleanly is less likely to tear the surface later.
Holding the drill square also matters. If the tool leans, one side of the bit cuts deeper than the other. That side load can enlarge the hole, chip the rim, and cause the exit side to break unevenly. A simple guide block or drill guide can help when the hole must be straight, repeated, or close to a finished edge.
Use Backing to Prevent Exit Tear-Out
Backing material is one of the simplest ways to protect the exit side. Place a scrap board tightly against the back of the workpiece so the final fibers are supported as the bit exits. The backing should be flat, clean, and clamped if the piece can move. A Drill Bit then cuts into the scrap instead of pushing unsupported fibers into open air.
Backing is especially useful for plywood, veneered panels, thin boards, and finished trim. These materials can look clean on the entry face but splinter badly at the back. If both faces will be visible, drill partway from one side until the point just appears, then finish from the other side using the small point mark as a guide. That method takes more time, but it keeps both rims cleaner.
Reduce feed pressure near breakthrough. Many operators drill smoothly for most of the depth, then push harder when the bit slows or almost exits. That final push is exactly when the wood needs the least force. A Drill Bit should be allowed to finish the cut rather than punch the last fibers out of the board.

Control Speed, Feed, and Heat
Speed affects edge quality. Too slow can make the bit grab in some woods, while too fast can heat the cutting edge, burn the surface, or polish the fibers instead of cutting them. The correct speed depends on diameter, bit style, wood type, and hole depth. A small sharp Drill Bit can run faster than a large bit, while a wide bit usually needs slower speed and firmer control.
Feed pressure should create chips, not smoke or dust. If the bit produces fine powder, squeals, or burns the hole wall, the edge may be dull or the speed may be too high. If large chunks break away, the feed may be too aggressive or the exit side may be unsupported. A Drill Bit gives useful feedback through sound, chip shape, and the feel of the tool.
Heat is not just a comfort issue. A hot bit can dull faster, scorch finished surfaces, soften coatings, and make resinous wood gum up the flutes. Stop and clear chips during deeper holes. If the flutes pack tightly, the bit rubs rather than cuts. A clean chip path is part of a clean edge.
Keep Chips Moving Out of the Hole
Packed chips cause many rough holes. As chips build up, the flutes stop clearing, the tool needs more pressure, and the side of the hole begins to rub. A Drill Bit that is forced through packed chips can heat up, wander, or break fibers along the rim. This is common in deep holes, damp wood, resinous softwood, and thick laminated boards.
Withdraw the bit periodically during deep drilling. Let the flutes carry chips out, then re-enter the hole along the same line. Do not wiggle the tool sideways to clear chips. Side movement enlarges the hole and damages the wall. If chip packing happens repeatedly, check whether the bit style is right for the depth and whether the edge is still sharp.
Compressed air or a small brush can help clear the hole, but the main solution is controlled drilling. A Drill Bit that clears chips well will feel smoother, cut cooler, and leave a more consistent wall. For repeated production holes, chip control also keeps hole diameter more predictable from the first piece to the last.
Choose the Right Approach for Different Wood Products
Solid softwood usually cuts easily, but it can split along the grain if the hole is near an edge or if the bit pulls too hard. Hardwood may need sharper edges and more controlled feed because dense grain resists the cut. Plywood and veneer need special care because the top layer can lift even when the core drills cleanly. MDF cuts smoothly but creates fine dust and can fuzz around the rim if the bit is dull.
A Drill Bit should be checked against the actual material before drilling all parts. Test on an offcut from the same board or panel. The test hole should show whether the rim is clean, whether the back splinters, whether the bit tracks straight, and whether heat appears. Adjust speed, backing, pressure, or bit style before moving to the finished piece.
Laminated surfaces need careful starts. Masking tape can reduce surface scratching, but it does not replace a sharp edge or backing board. The bit still needs to cut the surface cleanly. If a laminate chips at the entry face, start slower, check the point, and use a guide. A Drill Bit that wanders on a slick surface should not be forced to correct itself mid-hole.
Read the Hole and Correct the Setup
The finished hole tells the story. A fuzzy rim suggests dull edges, high speed, or soft fibers. Burn marks suggest too much speed, poor chip clearance, or a bit that is rubbing. An oval hole suggests angle change, side load, or movement. A torn exit side suggests no backing or too much pressure near breakthrough. A Drill Bit should be inspected after these signs appear, not only after it breaks.
If the same defect appears on several holes, stop and correct the setup. Replacing the workpiece without changing the cause wastes material. Check bit sharpness, drill angle, clamping, backing, speed, feed pressure, and chip removal. The correction is usually small, but it must happen before the next visible hole.
| Hole defect | Likely cause | Correction before the next hole |
|---|---|---|
| Splintered exit side | Unsupported fibers or heavy final pressure | Clamp backing and ease pressure near breakthrough |
| Ragged entry rim | Skating point, dull edge, or fast start | Start lightly and use a better-centering bit |
| Burned wall | Heat, packed chips, or excessive speed | Lower speed and clear chips more often |
| Oversized hole | Side load or tool angle change | Use a guide and hold the drill square |
| Fuzzy fibers | Dull cutting lips or soft grain | Use a sharper bit and make a test cut |
When to Replace or Retire the Bit
A damaged bit cannot make reliable clean holes. Look at the point, cutting lips, spurs, flutes, and shank. If the point is bent, the edge is chipped, the spurs are worn, or the bit wobbles in the chuck, it will not cut an accurate rim. A Drill Bit that has overheated may look discolored and may lose its edge quickly even after it cools.
Do not judge the bit only by whether it still spins. Woodworking holes often fail visually before the bit fails mechanically. If a bit needs extra pressure, leaves fuzz on every hole, burns at normal speed, or wanders on a marked point, it should be sharpened or replaced. A Drill Bit used for finished work should be held to a higher standard than one used for rough framing.
Storage matters too. Loose bits knocking around in a box can chip small cutting edges. Resin and dust can build up on flutes. Clean the bit after use, keep sharp edges protected, and separate sizes so the correct bit is easy to find. Good storage is a quiet part of good hole quality.
A Practical Workflow for Clean Wood Holes
The most reliable workflow is simple. Confirm the hole size and depth, choose a bit style that suits the finish requirement, mark the center, support the work, use backing if the hole exits, start with light pressure, clear chips during deeper cuts, and reduce pressure near breakthrough. A Drill Bit performs best when each part of the setup supports the cutting action.
For repeated holes, make the process repeatable. Use a stop collar, depth mark, guide block, template, or jig when the spacing and depth must stay consistent. Check the first few holes before drilling the rest. If the rim begins to look worse, inspect the bit and clear chips. Consistency matters more than speed when the hole remains visible.
This workflow also helps a buyer choose tools more intelligently. The question is not only which diameter to buy. It is what type of cut the job requires and how much finish quality is expected. That is where a clear Drill Bit selection process saves time.
How Bestwin Fits Into the Selection
When the job involves clean holes in wood, Bestwin drill bit and woodworking options can be considered after the user has defined the material, hole size, depth, and finish requirement. A wood auger style, a general drill bit category, or a woodworking series option should be matched to the actual task rather than chosen only because the diameter looks close.
For procurement and workshop teams, Drill Bit selection becomes easier when the order notes include material, hole diameter, finish side, depth, and whether backing or a guide will be used. That keeps the tool choice connected to the real cutting condition and reduces preventable edge damage.
Final Takeaway
A clean wood hole depends on the bit, the surface, and the way the final fibers are supported. Choose a Drill Bit that starts accurately, cuts the rim cleanly, clears chips, and stays sharp. Clamp the work, use backing when the hole exits, control speed and pressure, and inspect the result before repeating the hole across finished parts.
Splitting and tear-out are usually preventable. When the hole quality matters, do not let the bit punch through unsupported wood or force a dull edge through packed chips. A careful setup lets the Drill Bit cut the wood instead of tearing it apart.
That final check keeps each Drill Bit decision tied to the visible finish.










 English
  العربية
  Français
  Português
  Português do Brasil
  Italiano
  简体中文
简体中文  繁體中文
繁體中文  日本語
日本語  한국어
한국어  Deutsch
  Español
  Slovenčina
  ไทย
ไทย  Türkçe